How to design isometric buildings
This title is a bit misleading, in fact this article is not about how to design to its essence: how to use colors, forms, how to draw… these are mastered during the long time training in an art school, I will not be able to teach you all these in an article. Instead, this article offers some useful tips in this particular area, they would help you to make your concept art of isometric asset fit better to the production pipe line. Here we go!
Before starting:
You would have three things to decide:
1.Origin of the inspiration
It’s better to base your design on something real in the world. For example, the design is inspired by buildings in New Orleans, or in Cairo slum.


This can give your design much life. Even if the game is fantasy themed, don’t draw purely out of imagination. I recently found that the art in PS2 blockbuster Shadow of Colossus was pretty much inspired by Indian architectures. See this picture, do you find something familiar?

In this step, gather as much relevant photos as you can. This is what we do in our projects, we have gathered photos of Miami, Cairo, Prague from all the channels available. If you have the budget, you can even arrange a journey to the site :)
2. The style and quality of production art
This is the goal you’re going to. You can study the isometric assets of games in the market, to find out the style and quality you want. For example:


If things out there don’t please you, you can ask your team to do some experimental creation, to make one or two samples, that you can set it as your project target.
3. Isometric grid setting
For symmetric, uniform isometric setting like this, you only need to decide the value of A; Or the value of a/b.

For non-uniform setting like this, of course you can’t draw the grid free handed. Chances are the lines don’t abide to the law of perspective, that later if you decide to produce the buildings in 3D, it would be impossible to match the camera.

Please see the appendix to see how to draw it right.
And more often than not, the grid setting is offered by the game design team or client, you don’t need to worry about the lousy things above! So the first thing when you take over such a job, is to ask them for the grid setting.
During the design:
1. Decide the dimension of the building
While you have the unit grid, typically, the dimension of the building is measured by the grid. For example, 1x1 for a telephone booth, 3x3 for a super market.
And how high the building is, 1 unit or 2 unit ?

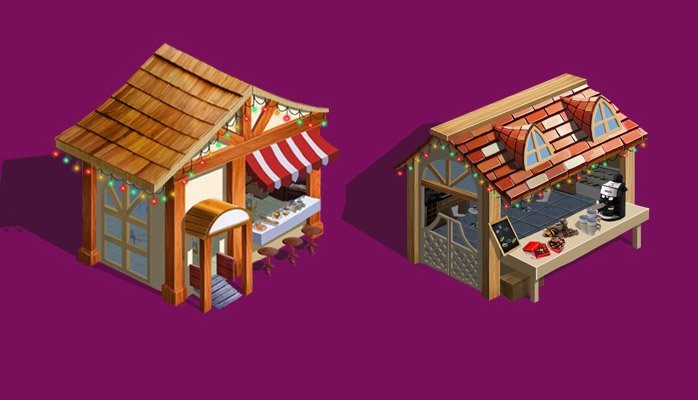
2. Match the size of the details
When you put all the buildings on the map, the size of the details on all the buildings should be matched. The most notable features are the doors and windows. If you find a door on one house is human size, and the door on the next house is for goblins, it would be weird and unreasonable.
See this picture, the red guys line up in front of the house. We put them there as “scale men”. Their size in relation to grid is unchanged across all the building designs. And when do the design, we think them as real people, and all the structures on the building should match their size.

And there are occasions we break this “scale men” rule. For example, when designing real big things, like a football stadium. If we still abide to this rule, the stadium would be big enough to cover the whole screen and beyond, that’s crazy!
And you can see in the actual game, the Avatar is much bigger than the “scale men”. I’m sure you know why.

3. Give color palette
Like this picture, give color palette as small color blocks. This would be a good guide later when the building is moved to production. That would be especially helpful if the production building needs color variations.

4. Specify materials
You may specify the material of different parts like this:

And for things are apparently what they are, for example glass for windows, wood for chairs, just forget about them.
5. Angles to draw
Typically, it makes perfect sense to draw to fit the map grid, like this:

That everyone in the team could have a good preview. And in addition to this, you can draw a more flat view like this:

This could help the production team (either 2D or 3D) understand the structure and do things right.
If your grid definition is flat enough, you need only one drawing.
Another thing to consider, is do you need rotated building in the game? Like this example:

If you do, you need to draw more angles.
For the example below, the game needs no rotated buildings, so the concept artist makes only one drawing. And you can see the 3D assets, only the front is built, the back is empty (it doesn’t make sense to build a side which is never seen.)

6. Study the space
Do some study of the space and structure, make sure your drawing is spatially valid (Unless the game intents to create visual illusion like that in Monument Valley). Otherwise it would create difficulties when people take your concept over to production.
7. Animations
You may consider some movements for the buildings, these would give much life. For example the turning of the mill wheel, weather cock, fluttering of banners.
There’re mainly two types of animations for isometric buildings, the movement of solid parts, and special effects like flickering of lights and water flow.
When dealing with lights, drawing a picture of the all lights are turned on.

8. “Build-up” animation
In some games you can see the Build-up process of the buildings, there are graphics at different progress of the building process.
In constructing a real building, first the steel skeleton is setup, then concrete panels are hoisted to place, then the outer side decos are added.
In doing concept art for the progress, you do it in the inversed order. First made the concept of the finished building, get it approved. Then move parts of the finished building away, draw the exposed cross section, construct the skeleton according to the finished building, etc, etc. Ok, you are smart, I ‘m sure you know what to do next!

9. Incorporate 3D models to the design
It would be faster to merge 3D renders(or stock photos) into your design than to draw them by yourself. Here are some examples in our projects:
Trucks:

Ship:

Chairs:

10. Re-useable drawings
When designing for a project, it’s bound to be lots of repetitive things: Chairs, umbrellas, windows, etc. Be mindful of them, to save your time of drawing the same things again.
Appendix: How to draw non-uniform grid lines

First, draw a circle. Then squash the circle to get an ellipse inside. Think that you have a circle on floor, after the isometric projection, it becomes an ellipse. How flat the ellipse is, depends on the viewpoint is high or low. So you decide how flat the ellipse is, and the value of a/b is decided by you.

Then draw a line “m” through the center of the circle. The value of the leaning angle M is specified by you. Then draw a line “n” through the center of the circle, perpendicular to “m”. Now line “m” and “n” intersect the circle at point A and B. Draw vertical lines from A and B, project on the ellipse at A’ and B’.

Connect A’B’, line segment A’B’ is the first edge of your isometric grid. Duplicate this segment, place it to the other side of the ellipse: There is only one position for the segment to touch the ellipse on both ends. Then you get point C and D. Connect the points, now rhomboid A’B’CD is an unit grid of your game. It’s shape depends on the values you specify, a/b and M.
In fact, the uniform grid setting is just a special case that the leaning angle of line “m” equals to zero.

Senior Creative Project Manager | Consultant
9yGreat Read. Brilliant break downs.
General Manager at Product Madness
9yyou guys are great at isometric art :-)